Category Archives: Gardening

Got Milk?

cowAs a cheese maker, a mom, a consumer and a 2015 Illinois Farm Family City Mom, I was delighted to be invited to tour the Dean Foods and one of their suppliers, Lindale Holesteins’, a local, family owned Dairy Farm.

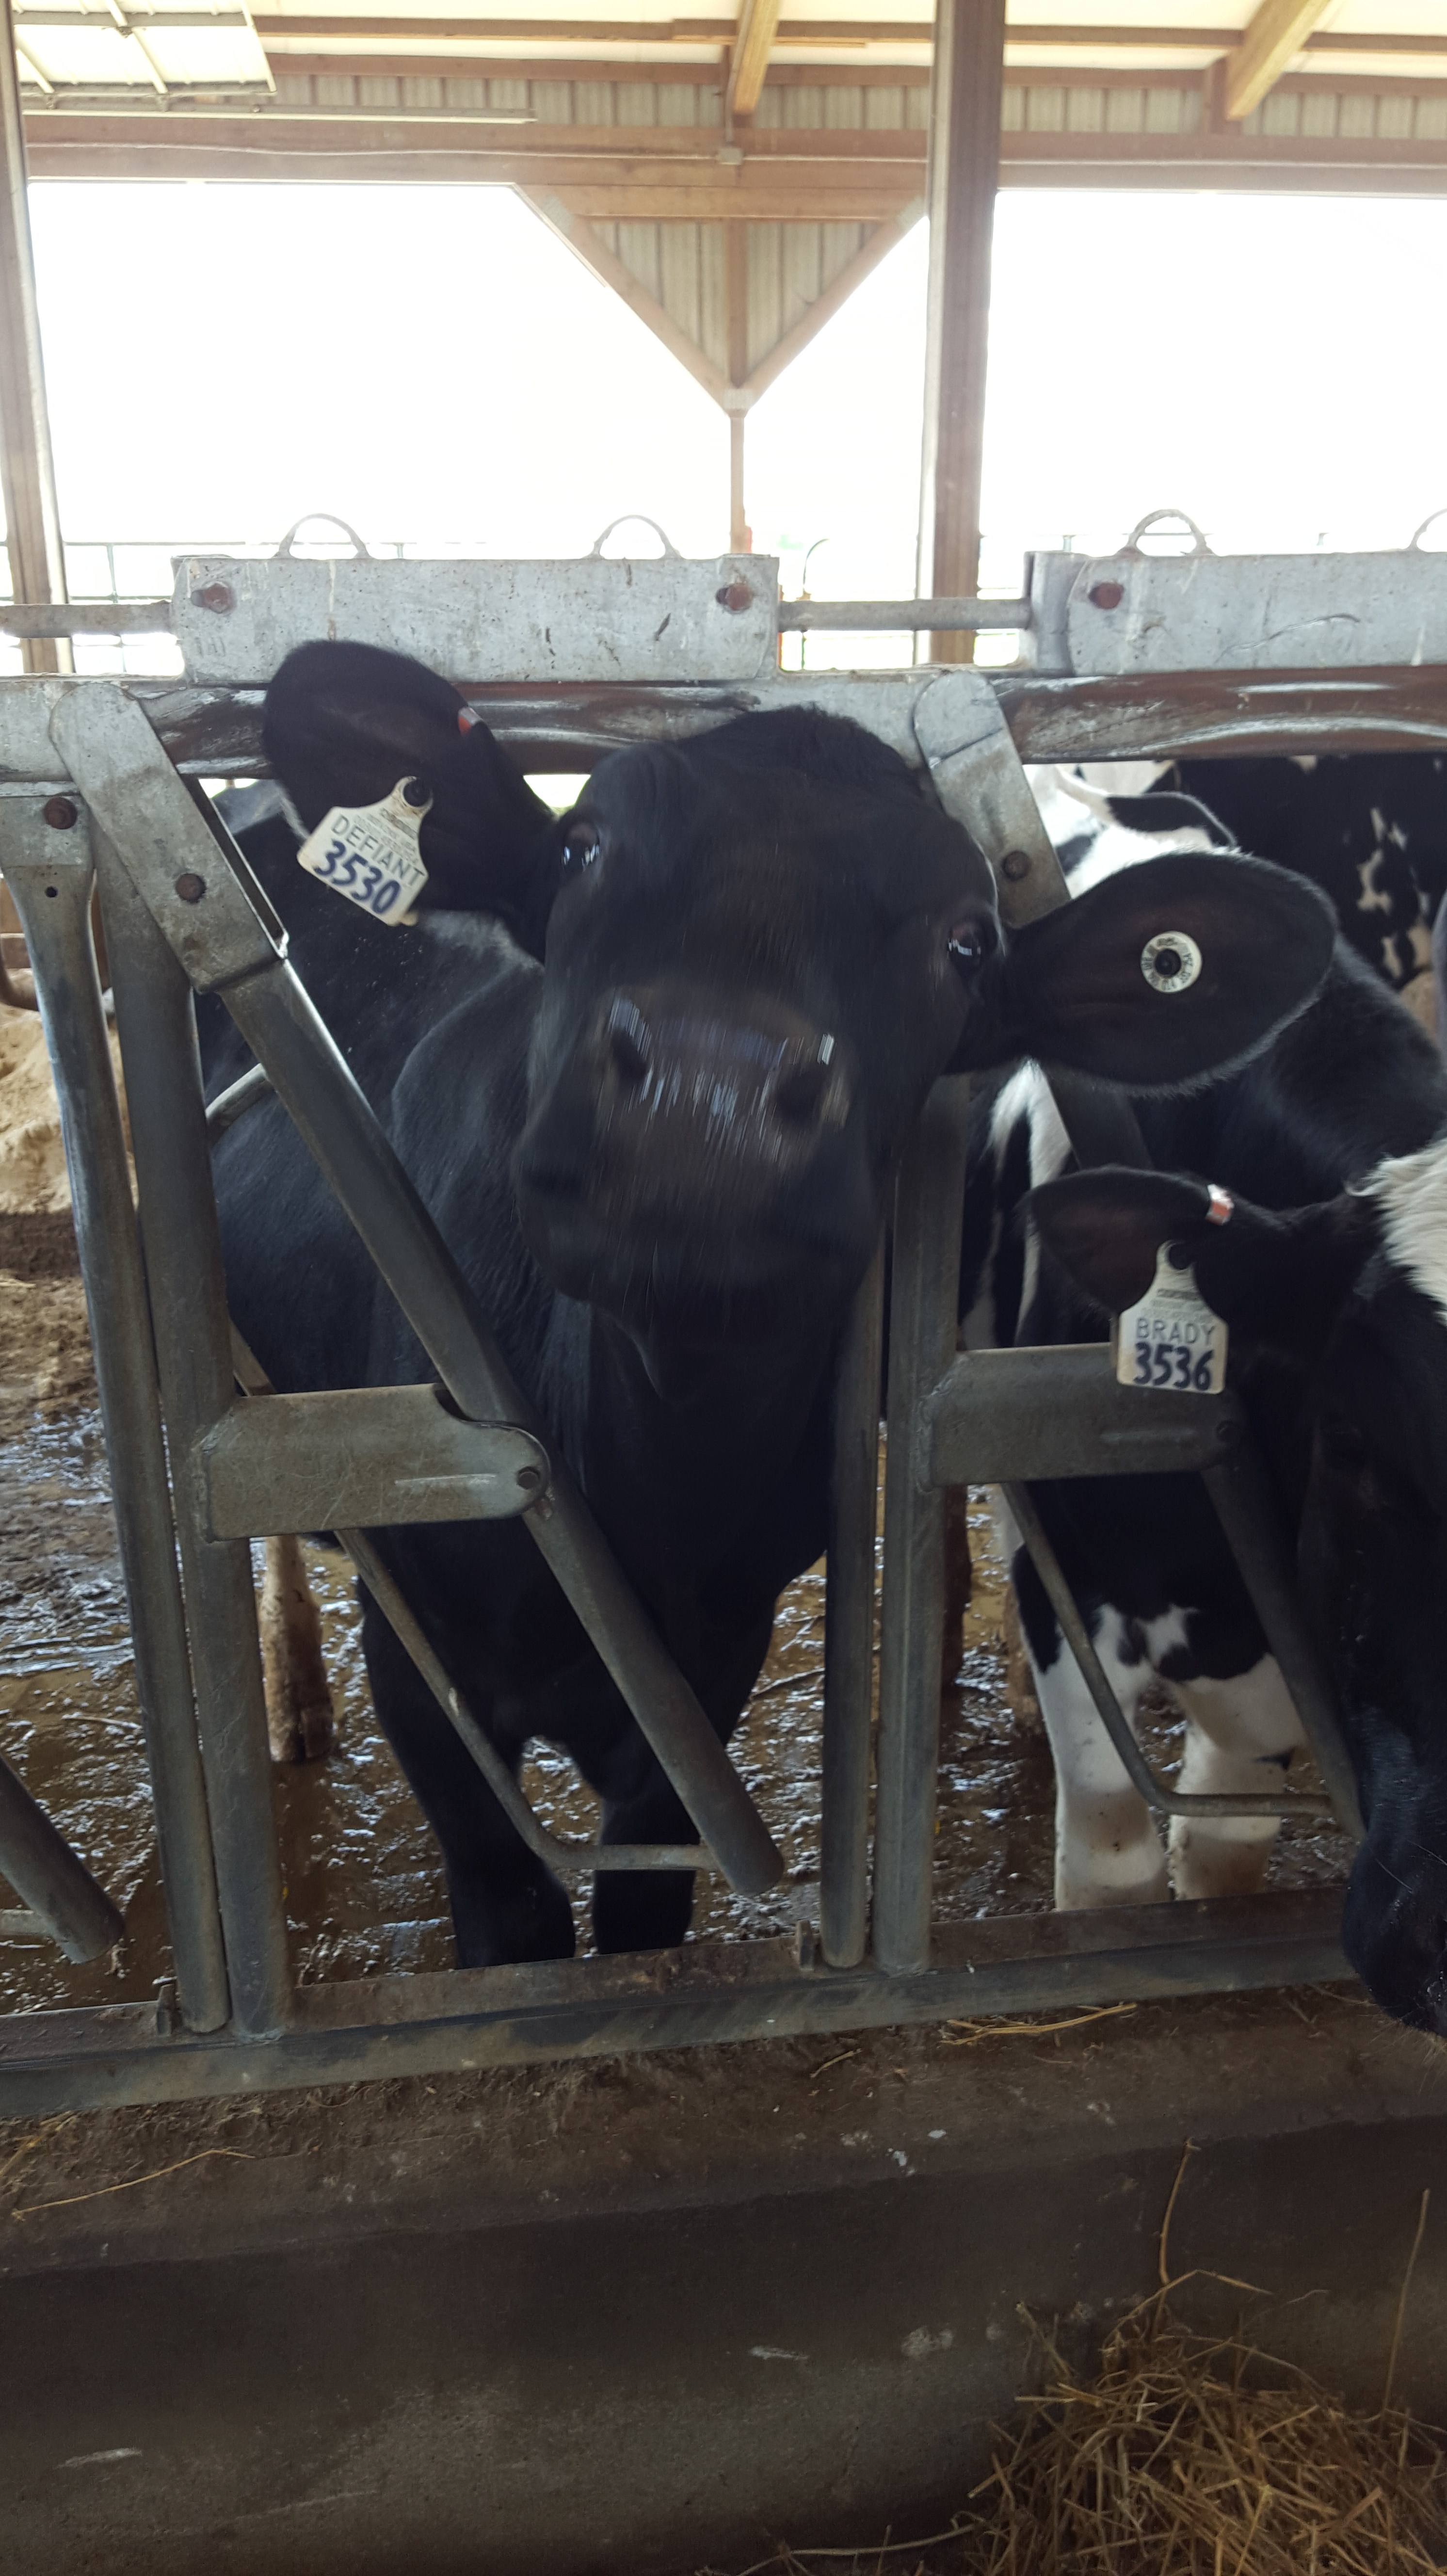
The Lindale Farm is located about an hour and a half from my home outside Chicago.  It is amazing how quickly city life and strip malls are replaced by rolling fields and livestock.  The farm is beautiful and looks just like you wish all farms would look.  There is no sign of factory farming here.  The animals are in open air pens with plenty of room to move around and bedding deep enough to lose little boy blue.  The animals are let out to pasture twice a day, and they looked pretty content cozying up to each other.  Children and dogs are running around and most of the family is involved in the operation.  There is also a veterinarian on staff that manages the feed and health of the animals.

The actual milking takes place twice a day and it takes 3 1/2 hours each time.  That is 7 hours a day, 365 days a year.  What a responsibility!  Although they have state of the art milking equipment, it is still a hands on operation.  The cows are led into the milking parlour.  Their udders are cleaned by hand and they are then hooked up to the pump.  Once the flow subsides, the pump automatically disconnects from the udders and the cows are sent back out of the parlour. The milk is stored in tanks and never touches human hands or the air.  Once it gets to Dean’s, it will be pasteurized.

This visit to a family owned dairy farm was wonderful.  The animals are treated well and the family takes pride in providing our community clean, safe milk.

We built a bunch of garden beds

GardenbedsWe built some garden beds at our school today.  We have had a great little veggie garden the last few years, but it had a bit too much shade and bit too little access to water.  A very dedicated teacher spent the summers watering it without much help and without a spigot nearby.  So, our very generous PTO agreed to fund a new garden using some wood taken down during the construction of our new playground.  The new garden beds will have more sun and are very close to water.  My husband designed the beds and went to buy all the supplies last night with my oldest daughter (while I took a bath and the little kids watched a movie!).  Then, a great group of volunteers spent about 4 hours today building 7 beds that are approximately 4ft. X 8ft.  We lined the beds to keep the existing soil and contaminants from the wood out and will be getting a delivery of a high quality soil/compost mix in the next week or so.  I think they turned out great.  I cannot wait to start planting.  I just hope the kids enjoy it.  The best part of this project is that we hope to have families in our school community sign up to care for the garden for one week over the Summer.  They will be responsible for weeding, watering and harvesting (for themselves or others) for their assigned week.  If we do well, we hope to take some extra produce over to the Food Pantry.  Does your school have a vegetable garden?

Sowing Winter Seeds

My favorite kale to winter sow is Lacinato Kale

My favorite kale to winter sow is Lacinato Kale

It is still pretty cold here in our little corner of Chicago.  In fact, my kids had to line up for school inside today rather than on the playground due to the wind chill.  But, it is bright and sunny and it is making me anxious to get out and start planting.  Even though the tulips, garlic and crocuses are poking up, the ground still feels frozen to me.  Some may call me obsessive, but I cannot wait to get out there.  Since, I can’t plant directly in my veggie beds, I am going to do the next best thing…winter sow in containers.I first learned about winter sowing  in containers in a gardening class I took through a local Park District.  I am now ADDICTED. It feeds my values of gardening early, growing food, and reusing old containers.  Here is what you need:

  1. Any transparent or semi-transparent plastic container with a wide lid or a plastic milk jug that can be easily cut.  You will be amazed how many containers you will find that were headed for the recycling or trash.   I use milk jugs, clear clamshell containers from berries, clear plastic bottles from juice, and pint sized containers with lids from our local Chinese restaurant.
  2. A good quality seed starting mix.  I use store bought to make it easier, but you could make your own.  Do not use garden soil as it will be too heavy and dense and might have diseases.
  3. Cold season vegetable seeds.  Think lettuces, broccoli, kale, arugula, peas or spinach;  Not, tomatoes, melons or peppers.
  4. Scissors and/or something to puncture holes in the plastic.  A drill works nicely on harder plastics (like my containers that held $10 worth of chocolate covered almonds that I had to have from Costco)
  5. Clear, wide packing tape.

Once you have collected your materials, you are read to begin!

  1. Puncture air and drainage holes in the bottom of the container and around the top of the container or in the lid (if it is a wide mouthed container).
  2. For narrow mouthed containers (like milk jugs), you need to cut around the midline of the container to allow access to the plants once they grow.  I like to cut almost all the way around leaving a few inches still attached.  This allows me to use the handle of the milk jug to pull back the lid I have just created without the top and bottom being completely detached.
    milkjug   milkjug2
  3. Add soil and seeds.
  4. Water gently (a clean spray bottle works nicely)
  5. Close the lid on  wide mouth containers and/or tape over the line you just cut on the narrow mouthed containers to help keep the moisture in and to keep the seedlings protected from the wind.
  6. Set  the containers outside in the sunniest spot of your yard even if it is still cold.  I have mine up and down my back stairs.   I have found that seeds sown this way tend to be stronger and healthier plants than those I grow under lights in my basement because they are protected, but are not completely sheltered.  The seeds basically have the best of two worlds:  their own mini greenhouse and gradual exposure to their future growing conditions.
  7. When the seeds sprout, you can remove the lid  or pull back the lid to allow the seeds more room to grow and direct access to the sunlight.
  8. When the seedlings are ready and the weather is cooperating, transplant them into your garden.

Enjoy!  Please post and let us know how your seedlings are doing!

To Bee or Not to Bee

honeybeeI just finished reading The Accidental Beekeeper by Marina Marchese and I just finished having a cup of tea with honey in it.  So, of course my mind is racing.  Could I get a beehive?  Where would I put it?  Is my yard big enough?   How much honey will we get?  How many candles could we make?  When I was younger my uncle kept bees, but he had acres of land so the kids didn’t have ever get too close to the bees.  My kids would be right near the hive and so would all of my neighbors’ kids and dogs. There are probably not enough boxes of peppermint bark to give away if one of my neighbors’ kids get stung.

And yet, I cannot stop thinking about it. I have my eyes on my garage roof.  That one car garage roof has become a mansion in my mind.  I have had so many plans with what we could do with it.  A rooftop garden, a chicken coop, a playroom, a mushroom farm were among the latest.  If only my husband were an architect…oh, wait, he is.   Unfortunately, he is the kind of architect who tells me the roof as it stands cannot structurally support any of my wild ideas or apparently my body weight.  We would need to build a new structure from scratch.  And, it would cost money.  If only my kids were not going to need to go to college in the future.

I am still trying to work out where to put a beehive.  I wonder if we could build an indoor one like they have at the zoo?  It is a hive with pvc tubing to the outside for the bees to come and go.  Kind of like a dryer vent.  There is no way my husband could say no to that, right?  I mean how much damage could thousands of bees really cause if they got loose in our basement?

Mushrooms Really are Fun Guys

I2012-03-18_15-34-21_59 started growing shiitake mushrooms in a one bedroom apartment in NYC under my kitchen table in 1995.  I bought a small log that came pre- inoculated and a standard 24 inch rectangular plastic planter.  I would soak the log with non-chlorinated ice water and then stand it on end in the container under my table (in the shade) and wait a few days for mushrooms to grow.  It was weird, and fun and delicious.  Over the years I have purchased lots of mushroom kits.  You can get them online all over now.  Portobellos in a box.  White mushrooms in coffee grounds or sawdust.  Oyster mushroom kits for kids in toy stores.  Mushrooms are tasty and fast growing if you grow them in these boxed kits.  And they are a lot of fun to watch.

Now, I choose to grow shiitake mushrooms in logs.  Shiitakes are delicious and the home-grown ones are so much more flavorful than the dried or even fresh store-bought ones.  It is a long, slow, waiting process that takes a lot of patience.  But, once the logs begin fruiting, they will fruit for years to come.   First, you must have recently cut fresh wood and logs large enough in diameter that they will not easily dry out.  Four to six inches in diameter is a good size.  Next,drill holes in the log and stuff the holes with spore material.  It comes mixed with sawdust or in the form of plugs.  It is possible to purchase different strains of shiitakes.  Some will fruit in cooler weather, some in warmer weather. I like a variety so I can extend my growing season.   Once the spores are in the log, it is important to keep the birds out and the moisture in.  I typically water my logs once a week for the first month or so.  Then, I just let nature take its course and wait and wait and wait.

Mushroom logsIn 6-24 months (depending on the strain, the moisture level, the temperature and the elimination of other competing fungi) the log will start producing mushrooms.  Once a log begins fruiting, it will typically fruit a few times a year.  A good rain and the right temperature range will often trigger the logs. I typically get more fruiting in wetter weather. The weather here in Chicago has been so mild that my logs are still fruiting.  The shiitakes are so good, my 6 year old son will pick them and eat them raw right off the log.

Restraint is not my forte

eggplantI am working on figuring out my garden for next year.  You may think it is too early for the Midwest, but I typically start my seeds indoors under grow lights in February.  I am trying to get a handle on my addiction to plant too much.  I cannot pass up a pretty seed packet and the seed catalogues are like crack to me.  My garden is only about 40 X 5 feet with a couple of smaller areas around the yard dedicated to edible gardening.  So, in an attempt at full disclosure (more to myself, that to you readers out there) I am trying to list what exactly I have out there and hope to use some restraint this year in an attempt to get better yields.

Perennials:  Blueberries, asparagus, rhubarb, arugula, strawberries, grapes, blackberries, raspberries, currants, about 30 shiitake mushroom logs, a 3 variety grafted apple tree, 2 potted fig trees (I bring them in for the Winter), 2 potted tea plants (they come inside for Winter, too), and many more herbs that I can list here.

Annuals that grew (last year):  Cucumbers, sweet potatoes, a random volunteer pumpkin from the compost, 5 varieties of potatoes (in garbage cans and grow bags), peppers, 4 or 5 lettuces, beets, carrots, cabbage, kohlrabi, celery, garlic, shallots, snap and shelling peas, broccoli, radishes, many heirloom tomatoes, kale, swiss chard, watermelon, Asian melons, and eggplant.

Stuff that got crowded out and/or died:  turnips, brussel sprouts, storage onions, soybeans and various winter and summer squash.

I am making myself a promise to plant a bit less and to use up all my seeds before I buy more…unless I can get my hands on some South African peppedew seeds.